Last updated on: April 24, 2022
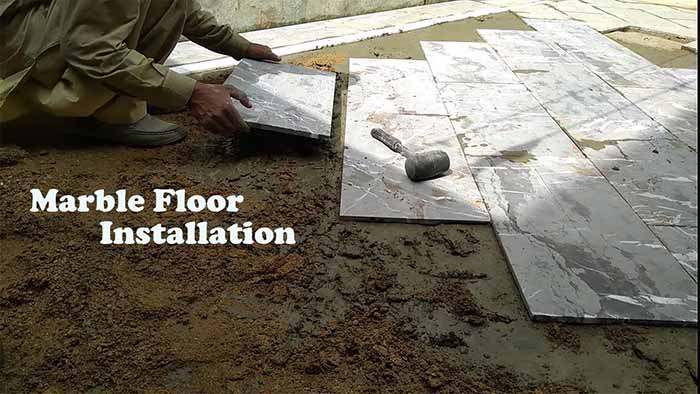
Method Statement for Marble Flooring and Marble Wall Cladding | Marble Flooring
In this article today we will talk about the Method Statement for Marble Flooring | How to Install Marble Wall Tiles | Method Statement for Marble Wall Cladding | Marble Flooring Installation | tile flooring installation | Wall Cladding Installation | Stone Cladding Installation | Method Statement for Marble Flooring Installation | Marble Wall Cladding Installation Procedure
Method Statement for Marble Flooring and Marble Wall Cladding:
1. Introduction:
The objective of the method statement is to outline the efficient and safe method of work to follow in order to safely and efficiently completes the installation of stone flooring and the precautionary measures taken to protect workers and existing facilities.
2. Scope of Work:
To define a Standard Operating Procedure for the installation of stone flooring finishes, it is the Policy of Contractor to provide a safe and healthy place of employment. In areas where stone flooring will be installed for any purpose, the following procedure shall be utilized.
3. Key Plant and Tools Required:
3.1 Equipment and Tools:
- Angel Grinder
- Various Hand tools (i.e. hammer, rubber mallet, chisel etc.)
- Mechanical mixer
- Measuring tape
- Spirit Level
- Notched trowel or spreader
- Rubber grout float
- Carpenter square
- Sponge How to Install Marble Wall Tiles
3.2 Man Power:
- Site engineer 01
- Supervisor 01
- Foreman 01
- Safety officer 01
- Installer 05
- Helpers 05 How to Install Marble Wall Tiles
3.3 Location:
Marble stone installation activity will be done at Timescale shall be for duration of Two weeks maximum. Locations to be installation marble stone as listed below.
- All Floors and walls How to Install Marble Wall Tiles
4. Key Materials Required:
- Stone flooring material as per engineer and/or client approval
- Portland cement as per ASTM 0150
- Sand
- Grout
- Stainless Steel Divider Strip How to Install Marble Wall Tiles
5. Work Methodology:
5.1 Mock Up:
- Prior to proceed installation, provide mock-up of stone flooring (3m X 3m) for engineer review & further verification of color & finishes under sample submission & establish standard quality for aesthetic effects expected on completed work use as the reference bench mark for workmanship & finishes required. tile flooring installation
- Stone flooring installation will not proceed unless mock-up is accepted & approved by Engineer and/or client. tile flooring installation
- Mock-Up will be retained upon acceptance & approval during construction period & accepted mock-ups in undisturbed conditions may become part of final work.
5.2 Delivery, Storage and Handling:
- Deliver & store stone flooring materials in original containers with seals unbroken & labels intact until the time of use.
- Store stone flooring & cementations materials on elevated platforms, under cover & in a dry location.
- Aggregates will be stored where grading & other required characteristics can be maintained & contaminations will be avoided.
- Liquid materials will be stored in unopened containers & protected from sunlight & freezing or follow approved manufacturer recommendations.
- Stone flooring will be handled with temporary protective coating on exposed surfaces to prevent coated surfaces from contacting backs or edges of other units.
- Remove coating from bonding surfaces prior to set the stone flooring. tile flooring installation
5.3 Limitations:
- Stone flooring will not be installed unless construction work in spaces or areas with other trades (MEP clearance etc.) was not completed in order not to be obstructed during installation.
- Where required, Stone flooring or setting materials etc. will not be installed or applied over waterproofing until waterproofing has cured, tested & proven water tight.
- Do not set stone flooring material when an ambient temperature is below 10°C as specified in specifications or standards. tile flooring installation
5.4 Preparation:
- Fabricate stone flooring in sizes and shape required to comply with requirements indicated on approved shop drawing including final client/designer approved samples.
- Stone flooring will be sound, durable, and free of imperfections such as vents, spalls, cracks, holes, seams, fissures, pits, stain producing minerals, foreign matter and other defects that will impair strength, durability and appearance.
- Cut stones to produce pieces of thickness, size and shape indicated on approved shop drawing, within recommended fabrication tolerances without defects on visible finish surfaces. tile flooring installation
- Ensure substrates in which stone flooring is to be installed are free from any loose materials such as dust, dirt, concrete laitance, oils, grease etc.
- Seal surface cracks with approved filler & level with existing substrate as per acceptable flatness tolerance specified.
- Fill any voids or spalls with approved filler as per setting & grout manufacturer recommendations.
- Unsuitable concrete surfaces are to be chipped off using portable jack hammer with care to achieve high adhesion between the existing slab and the concrete screed or bedding material to be applied.
- Place polyethylene film as cleavage membrane as per approved material where required Syndicated on approved shop drawings
- Approved filler will not be extended over expansion joints & control joints substrate.
- Stone Surfaces that are dirty or stained will be cleaned by removing soil, stains & foreign materials prior to proceed with placement. Clean stone flooring material prior to installation, including sawn backs, ensuring edges and surfaces are free of dirt, rust stains, iron particles and foreign material. Stone Cladding Installation
- Do not use cleaning compounds containing acids, harsh fillers, or abrasives.
5.5 Mixing Proportion:
- Portland Cement Mortar: A mixture of 1: 4 Portland cement & sand respectively for floors as per TCA handbook (2003-2004) 41st Edition
- 1 – part of Portland cement
- 4 – parts of sand Stone Cladding Installation
- Water – adequate amount of water to be added depending on the moisture content of sand used-if moisture content of sand is low, more amount of water is required. Water added to be sufficient to form a molded ball of mortar (See demonstration below)

5.6 Installation Process – Setting Out:
- Set stone flooring to determine the starting point as per latest approved shop drawing requirements & obtains Engineer inspection approval in order to proceed with installation.
- Set-out points, axes & levels will be provided prior to commence with installation of stone flooring.
- Unless indicated in approved shop drawing, lay out stone work at the center of stone flooring in both directions in each space starting at the floor threshold& adjust to minimize cutting.
- Where required, align joints when adjoining stone units on floor, base, and trim are the same size. Stone Cladding Installation
- Where required, control Joints location will be established &5mm gap provided or the same with required joint spacing between stone units as per approved shop drawing.
- Establish lines, levels and coursing using plastic spacers/setting button where necessary.
5.7 Installation of Stone Flooring:
- Lay stone flooring as per approved pattern indicated on approved shop drawing.
- Stone flooring will be set/installed on(30mm-50mm thick) Portland cement mortar bed to support stone flooring over full bearing surfaces
- Joint Widths: Unless indicated in shop drawing, install stone flooring with the following joint widths using joint spacer as demonstrated in approved mock-up for stone flooring.
- Cut and Fit Natural Stone units tight onto horizontal penetrations through units (fixtures, outlets, etc.) as per approved shop drawings. Ensure finish trim will cover cut edges. Form corner and bases neatly and align floor joints.
- Slightly spray substrate with water onto setting stone flooring in bedding material
- Place thresholds at door openings, allowing a 5mm gap between threshold & stone flooring material intended for the application of sealant. Notch stone for door stops where necessary
- Where changes in floor finish are encountered, provide a 10mm jointing gap for the insertion of approved stainless steel divider strip with 2mm allowance on each side for sealant applicant.
- Where required, install divider and expansion joint strips etc. at locations indicated on the approved shop drawing and where exposed edge of stone flooring meets carpet & other flooring finishes flush on top of the stone flooring.
- Expansion & control joints will be kept open/free from mortar or grout & apply approved joint sealant upon completion of stone work in accordance with the manufacturer instructions attached to the Inspection Request.
- Where required, installation of stone flooring near gypsum board partitions will be provided with polyethylene sheets 200mm from the wall (sealed to the structural slab) and 200mm from the structural slab to protect the gypsum wall board from wet materials.
- Ensure surplus bedding material on Stone flooring joints will be removing in order to allow grouting of the joints. Stone Cladding Installation
5.8 Wall Stone Installation:
- Area shall be vacuum clean from dampness and free from foreign-material etc
- Ensure surface to receive Stone have approved inspection request of previous activity.
- Reference Datum levels transferred to working location.
- Layout will be done as per approved pattern shown in shop drawings, considering perimeter conditions. Stone Cladding Installation
- Survey will be checked prior to installation and after completion.
- Approved corner-beads will be installed.
- Approved Material and mixing equipment’s to be arranged at work location.
- MEP clearance will be obtained prior to start installation work.
- Mixing will be carried out as per manufacturer’s recommendation.
- After mixing of material shall be consumed within specified time given in TDS.
- Spacers will be used to maintain joint width and alignment.
- Control joints and isolation joints shall be maintained as per approved shop drawings and approved sealant will be applied in these joints. Marble Wall Cladding Installation Procedure
5.9 Grouting:
- Prior to application of grout, allow bedded stone flooring to set at least 48 hours minimum.
- Ensure all joints were cleaned of dust, dirt, excess mortar etc. and stone flooring thickness are clear, raked out to minimum depth of 6 to 10mm and free from foreign contaminants.
- Mix grout in accordance with approved grout manufacturer recommendation to be attached to the Inspection Request.
- Apply approved grout to the joints spaces between stone units using a sponge or soft cloth and tool grout into joint voids.
- Spread grout over the surface of the stone flooring using trowel or spatula in order to fill properly the joints.
- Spread grout over the surface of the stone flooring using trowel or spatula in order to fill properly the joints. Marble Wall Cladding Installation Procedure
5.10 Cleaning and Protection:
- Clean stone flooring while work is in progress& remove excess sealant and smears as soon as sealant applied
- Upon completion of grout & dry, clean the stone flooring with damp sponge
- Provide stone cleaners of proper formulation for kinds of stones, finishes, and application as per stone flooring manufacturer recommendation.
- Do not use cleaning compounds containing acids, harsh fillers, or abrasives.
- Final cleaning of stone flooring surfaces not less than six days upon completion of grouting, pointing and joint sealing using clean water and soft rags etc.
- Ensure foot and wheel traffic on stone flooring will be prohibited until such time that bedding materials is completely cured for at least 7 days after grout application is completed.
- Provide proper protection of installed stone flooring in a manner acceptable to the manufacturer and installer to prevent defects/damage or deterioration at time of project substantial completion.
- Leave finished installed stone flooring with clean and free of cracked, chipped, broken or other defective stone. Marble Wall Cladding Installation Procedure
6. Method of Access and Egress to Working Areas:
- All employees entering the Parcels shall do so by making use of the access provided. Only authorized employees will be allowed to gain access into the Parcels.
- All employees will attend the SAUDI BAYTUR health and safety induction prior to entering the area of operation. Access permits will only be issued to employees on completion of the induction.
- Access and egress onto the back of any truck or trailer will be by means of a ladder, which will be secured to the side of the truck or trailer.
7. Health & Safety Risk and Control:
- Ensure work permit and supporting documents i.e. RAMS are signed and approved prior
commencing to activity. - Approved RAMS to be made available at the site and Job Specific hazards and control measure to be communicated to all personnel involved in the job.
- Ensure that all PPE is assessed for suitability for job, limitations, capability, and compatibility with other PPE.
- Approved RAMS to be made available at the site and Job Specific hazards and control measure to be communicated to all personnel involved in the job.
- Ensure workers were trained about manual handling technique.
- Avoiding unnecessary heavy manual handling of materials use mechanical equipment.
- All personnel shall attend safety induction/training prior to start any job at site.
- Pre-job STARRT/TBT meeting shall be conducted by job supervisor to brief workers about job specific hazards.
- Conduct site inspection to ensure access/egress is adequate for the task activities. Maintain good housekeeping of the work area.
- Lone working is not allowed.
- Ensure work area housekeeping is properly maintained.
- Use correct tools for the job. Do not use a tool or attachment for something it was not designed to. Ensure tools undergone inspection by a competent person and record must keep. Colour coded as required.
- Follow LOTO procedure strictly when needed – when required.
- Only competent/authorized person shall be assigned for the task.
- Emergency evacuation routes and procedure shall be reminded regularly to the site staff by construction and SHE team.
- Be familiar with emergency response procedure
- Any obstructions from pathways must be removed.
- Emergency contact lists shall be posted at site.
- Ensure work permit and supporting documents i.e. RAMS are signed and approved prior
commencing to activity. - Approved RAMS to be made available at the site and Job Specific hazards and control measure to be communicated to all personnel involved in the job.
- Ensure that all PPE is assessed for suitability for job, limitations, capability, and compatibility with other PPE.
OTHER POSTS:
-
Method Statement for Installation of Ceramic Tiles
-
Method Statement for Concrete Blockwork | CMU Block Work
-
Method Statement for Suspended Ceiling Installation
-
Method Statement for Gypsum Board Ceiling, Wall Partitioning & Cladding
-
Method Statement for Plastering Work | Portland Cement Plaster
Conclusion:
Full article on Method Statement for Marble Flooring | How to Install Marble Wall Tiles | Method Statement for Marble Wall Cladding | Marble Flooring Installation | tile flooring installation | Wall Cladding Installation | Stone Cladding Installation | Method Statement for Marble Flooring Installation | Marble Wall Cladding Installation Procedure. Thank you for the full reading of this article in “QA QC in Construction” platform in English. If you find this post helpful, then help others by sharing it on social media. Please share this article on social media for future uses.