Last updated on: April 24, 2022
Method Statement for Installation of Ceramic Tiles | Floor Tiles Installation Procedure
In this article today we will talk about the Method Statement for Installation of Ceramic Tiles | Floor Tiles Installation Procedure | Floor Tile Installation Steps | Ceramic Tile Installation Steps | How to Lay Tiles on Floor | How to Install Tile on Wall | Tiling Work Procedure | Ceramic Tile Installation Cost | Method Statement for Tiling Work
Method Statement for Installation of Ceramic Tiles:
1. Scope/Purpose:
This method statement is to outline the procedure of installation of ceramic tiles as per the approved drawings and finishing schedule. Floor Tile Installation Steps
2. Sequence of Related Activities:
- Approved shop drawing
- Material Approval
- MEP clearance
- Surface preparation
- Waterproofing
- Survey & Layout
- Logistics for arranging material and Equipment
- Installation of Tiles
- Grouting Ceramic Tile Installation Steps
3. Procedure:
3.1 Mock Up:
Mockup of each type of tile system will be carried out and this mockup will be used as reference for the further works acceptance. Location of mockup directed to include internal and external corners. Bull nose tiles and junctions with floors, walls, skirting, treads and risers. How to Lay Tiles on Floor
3.2 General Instructions:
- Tile ID, Size and Color to be verified once it received at site and Tile box’s to be stacked in vertical direction (Maximum 3 box can be stacked one over one) to avoid damage’s.
- Provide shop drawing at site prior to layout the tiles
- Tiles must be stacked ID/Size/Brand wise separate at store to trace easily.
- lm level marking (from Finished Floor Level – Top of Tile level) is necessary in all room walls prior to start surface preparation and Tiling process.
- Surface preparation to be completed (Cement slurry removal, chipping works, roughen the surface (where thickness is more / corners not in right angle, Hacking) prior to start layout. How to Install Tile on Wall
- Tiles to be segregated according to approved shop drawings-tile designation in near working areas and cured by water prior to start tiling works.
- Defected tiles to be separated and stacked in one place. Damaged tiles can be used where tile cut piece’s required How to Lay Tiles on Floor
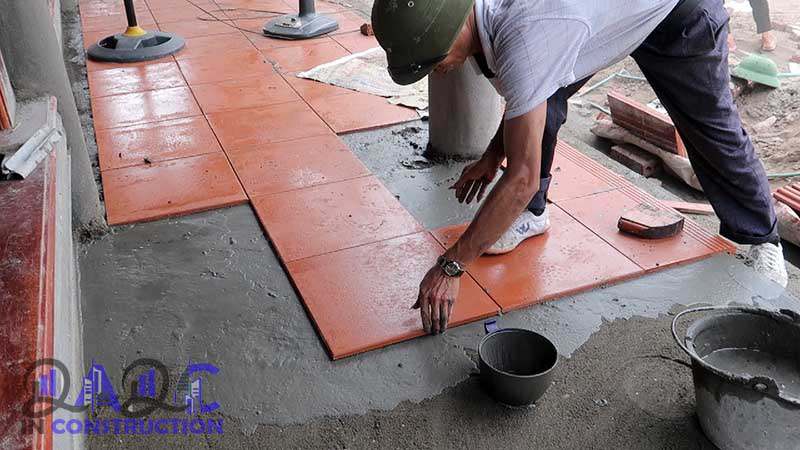
3.3 Floor Tiles Installation:
- Area shall be vacuum clean from dampness and free from foreign material etc.
- Make concrete / screed rough by chipping by suitable hand tool.
- Reference Datum levels transferred to working location. FFL marking (or lm marking) shall be provided to verify the thickness of adhesive.
- Layout will be done as per approved pattern shown in shop drawings, considering perimeter conditions threshold and floor dividers will be install as per finishing schedules
- Survey will be checked prior to installation and after completion. Check the room right angles to ensure the tile cut piece as per drawings.
- Approved Material and mixing equipment’s will be arranged at work location.
- MEP clearance will be obtained prior to start installation work.
- Mixing will be carried out as per manufacturer’s recommendation.
- Make sure that tiling placement in one direction as per printed arrow in rear face of tile. Tiling starting point to be followed as per drawings to minimize the wastages
- After mixing of material shall be consumed within specified time given in TDS.
- Spacers will be used to maintain uniform joint width and alignment. Ensured
joints are neat and tiles are closely fitted. - Lay the first tile in line with reference point. After the first tile is laid, put spacers on each corner of the tile. Place the next tile against the spacers of first tile & align the second tile for required line & level. Then place additional spacers. Repeat this process until completing the tiling work in particular location
- Tile joints, line, level and hollow sound to be checked immediately after the lay the tiles.
- Rubber hammer- pound to be provided gently for leveling the tile as required and immediate cleaning to be done after the tiling works (Excess Mortar to be cleaned thoroughly in right angle corners and grout gaps for tile grouting). Inspection request to be raised for completed tile works prior to tile grouting.
- Notched Trowel’ has to be used for applying the tile adhesives. The Notched Trowels come in various sizes, typically 6mm, 8mm, 10mm, etc., If we use 8mm trowel we can achieve the bed thickness of 4mm. The bed thickness usually varies from 3mm to 6mm based on the size of the tiles. Smaller the tiles lesser the bed thickness
- Control joints and isolation joints will be maintained as per approved shop drawings and approved sealant will be applied in these joints.
- Removing tile spacers: Leave the tile spacers in place while the adhesive or mortar is setting. These spacers have to be removed after 24 hours. The gap between the tiles has to be cleaned and maintained till grouting completion.
- Approved grouting material will be used as per manufacturer recommended method mentioned in TDS. How to Install Tile on Wall
- Before starting the grouting, the gap between the tiles has to be cleaned properly. Tile spacers have to be removed.
- A well-mixed grout in thick paste consistency is applied with putty blade on the gaps. The filling has to be done properly without leaving any air gaps.
- Then the excess grout is cleaned off from the tiles using a cleaning cloth or sponge.
- For straight edge tiles (wire cut) any of the 3 finishes recess, flush and wedge can be applied. For Ceramic tiles with curved edges, only the Recessed finish has to be implemented. If not, proper grout line can’t be achieved due to the curvature.
- After completion of tile grout, cleaning will be carried out and cleaning method depends on type of tile.
- For unglazed tile cleaning will be done not sooner than 14 days of installation with acid solution after taking confirmation from manufacturers of tiles and grout. Metal surfaces, cast iron and MEP fixtures will be protected from acid cleaning.
- For Dry quarry tile cleaning will be done by applying quarry tile filler upon confirmation from manufacturers. Repetition of application will be done to get uniform color in appearance of tile and grout.
- Protection of tile will be carried out with draft paper or other heavy covering during construction period.
- Foot and wheel traffic will be prohibited at least 7 days after grouting is completed.
- Before final inspection protection will be removed and rinse neutral cleaning from tile surface. How to Lay Tiles on Floor
3.4 Wall Tiles Installation:
- Area shall be vacuum clean from dampness and free from foreign-material etc.
- Ensure surface to receive tiles have approved inspection request of previous
activity. How to Install Tile on Wall - Reference Datum levels transferred to working location.
- Layout will be done as per approved pattern shown in shop drawings, considering perimeter conditions.
- Survey will be checked prior to installation and after completion.
- Approved corner-beads will be installed.
- Approved Material and mixing equipment’s to be arranged at work location.
- MEP clearance will be obtained prior to start installation work.
- Mixing will be carried out as per manufacturer’s recommendation.
- After mixing of material shall be consumed within specified time given in TDS.
- Spacers will be used to maintain joint width and alignment.
- Control joints and isolation joints shall be maintained as per approved shop drawings and approved sealant will be applied in these joints.
- Approved grouting material will be used as per manufacturer recommended method mentioned in TDS. Before starting the grouting, the gap between the tiles has to be cleaned properly. Tile spacers have to be removed.
- A well-mixed grout in thick paste consistency is applied with putty blade on the gaps. The filling has to be done properly without leaving any air gaps.
- Then the excess grout is cleaned off from the tiles using a cleaning cloth or sponge.
- For straight edge tiles (wire cut) any of the 3 finishes recess, flush and wedge can be applied. For Ceramic tiles with curved edges, only the Recessed finish has to be implemented. If not, proper grout line can’t be achieved due to the curvature.
- Ensure floor and wall tile joint width shall be same.
- Tile work shall be extended into recess and under or behind equipment fixtures to form a complete covering as indicated in shop drawings.
- Ensure cutting and grinding of tiles has taken care.
- Ensure all completed work shall be protect from any damage. How to Lay Tiles on Floor
4. Resources Requirement:
4.1 Man Power:
- Site engineer
- Supervisor
- Foreman
- Masons
- Helpers How to Install Tile on Wall
4.2 Material:
- Approved ceramic tiles
- Approved pre-bagged material ( Tile glue / Adhesive )
- Approved grunting material
- Spacers (as per design)
- Corner bead for Tiles Ceramic Tile Installation Cost
4.3 Equipment and Tool:
- Rubber hammer
- Notched Trowel 6mm, 8mm, 10mm
- Electric adhesive mixing drill
- Water jet cutting machine for Tiles
- Circular cutting drill
- Tele-handler
- Sponge Ceramic Tile Installation Cost
- Sprit level
- Plumb bob Method Statement for Tiling Work
5. Quality Control:
- Site QCI will make sure construction team perform works as per method statement. 6.2 Inspection request will be raised as per ITP.
- Surface preparation and layout will be checked and inspected prior to installation. 6.4 Ensure approved material used. Ceramic Tile Installation Cost
- Mixing of material will be checked randomly.
- Installation work will be surveillance.
- Inspection will be done prior to grouting, check hollow sound, uniformity of joint width and alignment, defects if any etc….
- Grouting mixing and application will be monitored. Tiling Work Procedure
6. Health, Safety Risk and Control:
- Ensure work permit and supporting documents i.e. RAMS are signed and approved prior commencing to activity.
- Approved RAMS to be made available at the site and Job Specific hazards and control measure to be communicated to all personnel involved in the job.
- Ensure that all PPE is assessed for suitability for job, limitations, capability, and compatibility with other PPE. Tiling Work Procedure
- Ensure workers were trained about manual handling technique.
- Avoiding unnecessary heavy manual handling of materials use mechanical equipment.
- All personnel shall attend safety induction/training prior to start any job at site.
- Pre-job STARRT/TBT meeting shall be conducted by job supervisor to brief workers about job specific hazards.
- Conduct site inspection to ensure access/egress is adequate for the task activities.
- Maintain good housekeeping of the work area.
- Lone working is not allowed.
- Ensure work area housekeeping is properly maintained.
- Use correct tools for the job. Do not use a tool or attachment for something it was not designed to. Ensure tools undergone inspection by a competent person and record must keep. Colour coded as required.
- Follow LOTO procedure strictly when needed – when required.
- Only competent/authorized person shall be assigned for the task.
- Emergency evacuation routes and procedure shall be reminded regularly to the site staff by construction and SHE team.
- Be familiar with emergency response procedure
- Any obstructions from pathways must be removed.
- Emergency contact lists shall be posted at site. Ceramic Tile Installation Cost
- Drop off / pick up point as per Logistic Plan and Traffic plan.
- Ensure that suitable and sufficient welfare facilities shall be provided.
OTHER POSTS:
-
Method Statement for Concrete Blockwork | CMU Block Work
-
Method Statement for Suspended Ceiling Installation
-
Method Statement for Gypsum Board Ceiling, Wall Partitioning & Cladding
-
Method Statement for Marble Flooring and Marble Wall Cladding
-
Method Statement for Plastering Work | Portland Cement Plaster
Conclusion:
Full article on Method Statement for Installation of Ceramic Tiles | Floor Tiles Installation Procedure | Floor Tile Installation Steps | Ceramic Tile Installation Steps | How to Lay Tiles on Floor | How to Install Tile on Wall | Tiling Work Procedure | Ceramic Tile Installation Cost | Method Statement for Tiling Work. Thank you for the full reading of this article in “QA QC in Construction” platform in English. If you find this post helpful, then help others by sharing it on social media. Please share this article on social media for future uses.


Thank you for sharing this! Just what I’ve been searching for. Great info!
Thanks for comment, For more related posts please visit Civil, Arch, Electrical and Mechanical Tab in File menu